For an in-depth updated guide on How to Download and Install Optifine click here
Before Downloading Optifine
In this step-by-step guide, you will learn how to download and install OptiFine in your PC in order to make Minecraft not just look better, but also run better.
OptiFine will allow you to access some hidden settings like changing more in depth graphics customizations allowing to increase your FPS and also allowing you to add shaders to Minecraft.
Keep in mind that any OptiFine above 1.20.5 will require Java 21, other versions like 1.16.5 to 1.20.4 will require Java 17, any version below 1.16.5 might require an older version of Java like Java 8.
Guide

Step 1 – How to Download OptiFine
Click the button on the right labeled as “Download Optifine Here” to redirect you to the Optifine download website.

Select the Download button for your desired version of Optifine, if you are downloading an older version, then just select “Show all versions”.
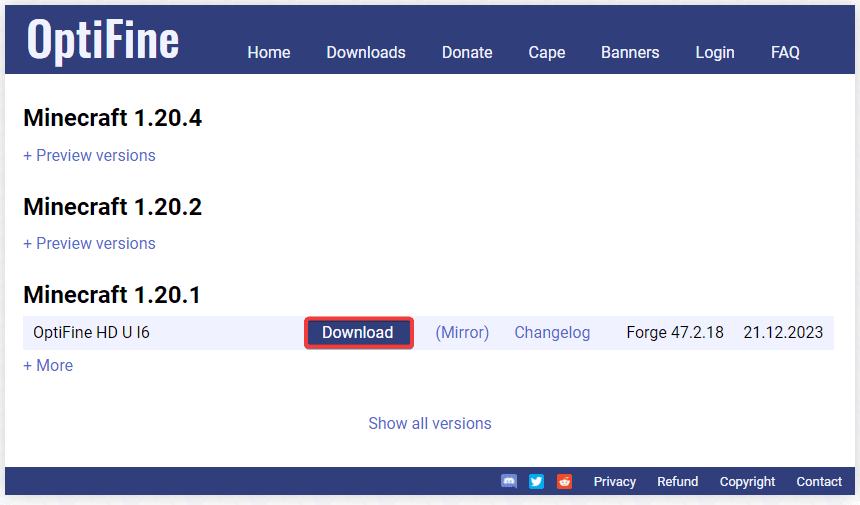
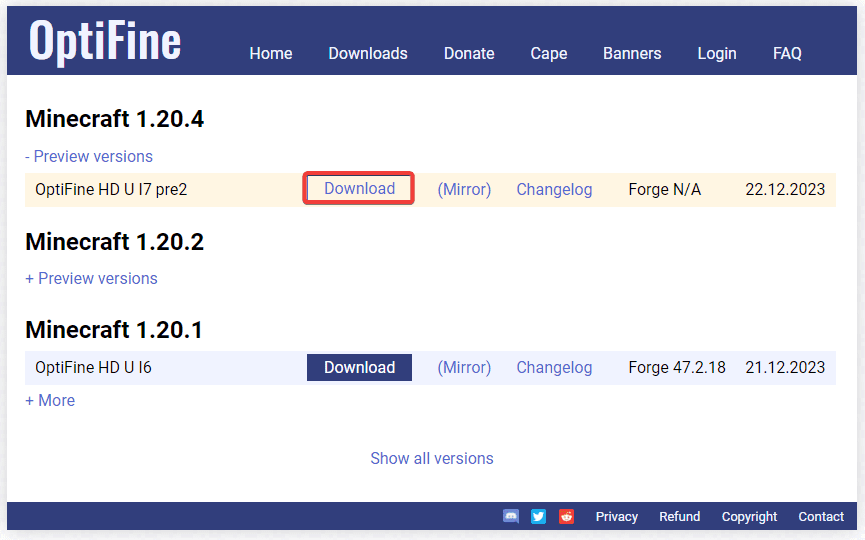
Now, if you are trying to download a version that is not fully out yet, click where it says “+ Preview Versions”

Now click the button labeled as download.
This will redirect you to a different page, where you have to click the button labeled as “Skip” in the top-right corner of the page.

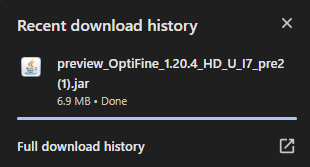
This will begin the download of our Optifine installer.
Step 2 – How to Install OptiFine
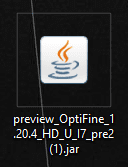
Open the file we downloaded in step 1.
This will launch the installer for Optifine, however, if you are having issues to open the OptiFine installer, you might need to update your Java version.
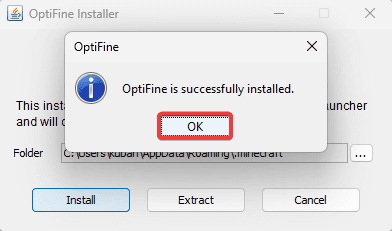
After we opened the installer for OptiFine, click the “Install” button.
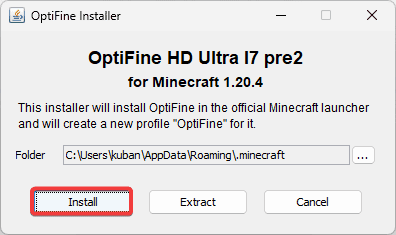
After a couple seconds, a pop-up will appear that reads, “OptiFine is successfully installed.
Step 3 – How to Use OptiFine
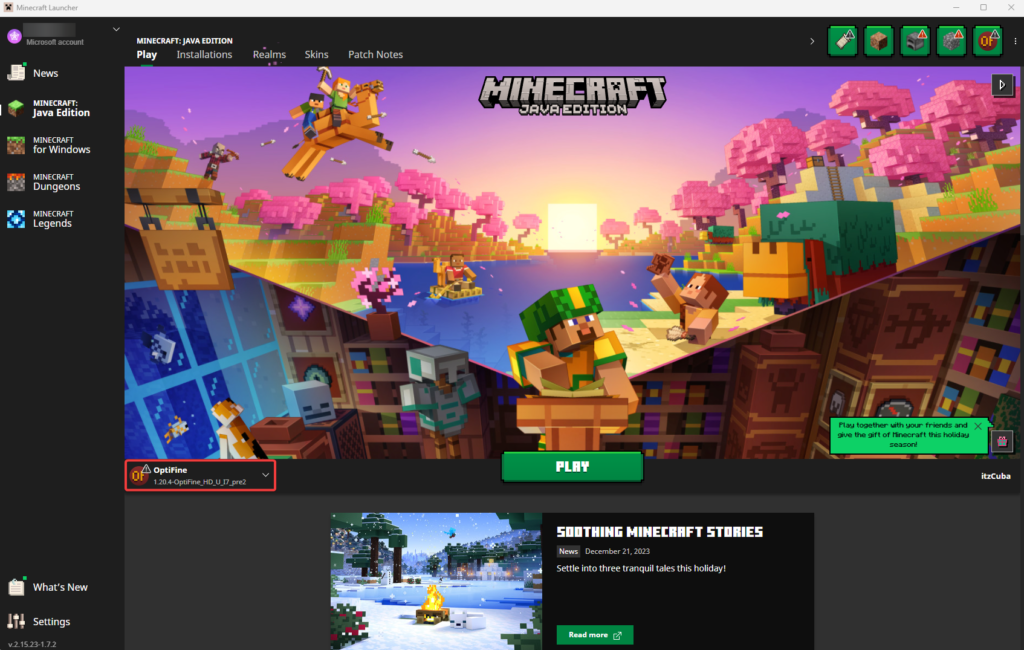
After we completed the previous steps in this guide, let’s open our Minecraft Launcher.
We should see OptiFine automatically selected if we installed it properly. You can click on Play now and enjoy OptiFine for Minecraft.
However, if OptiFine did not show automatically, we can fix that.
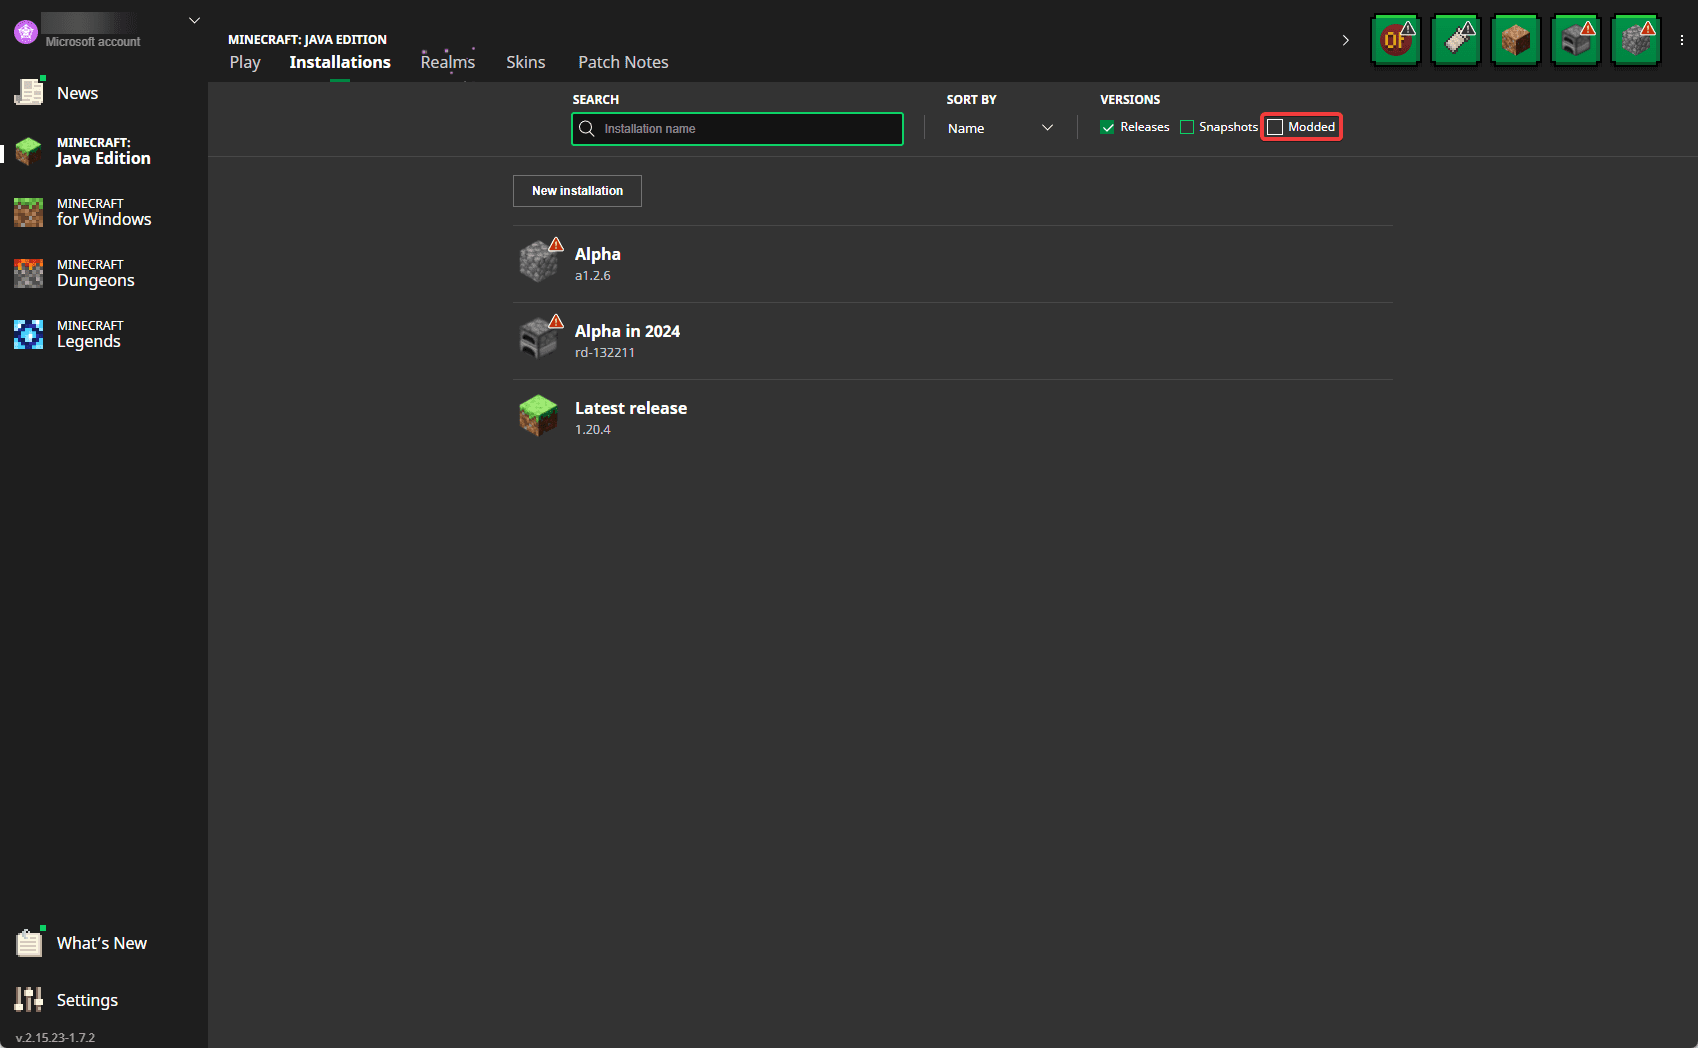
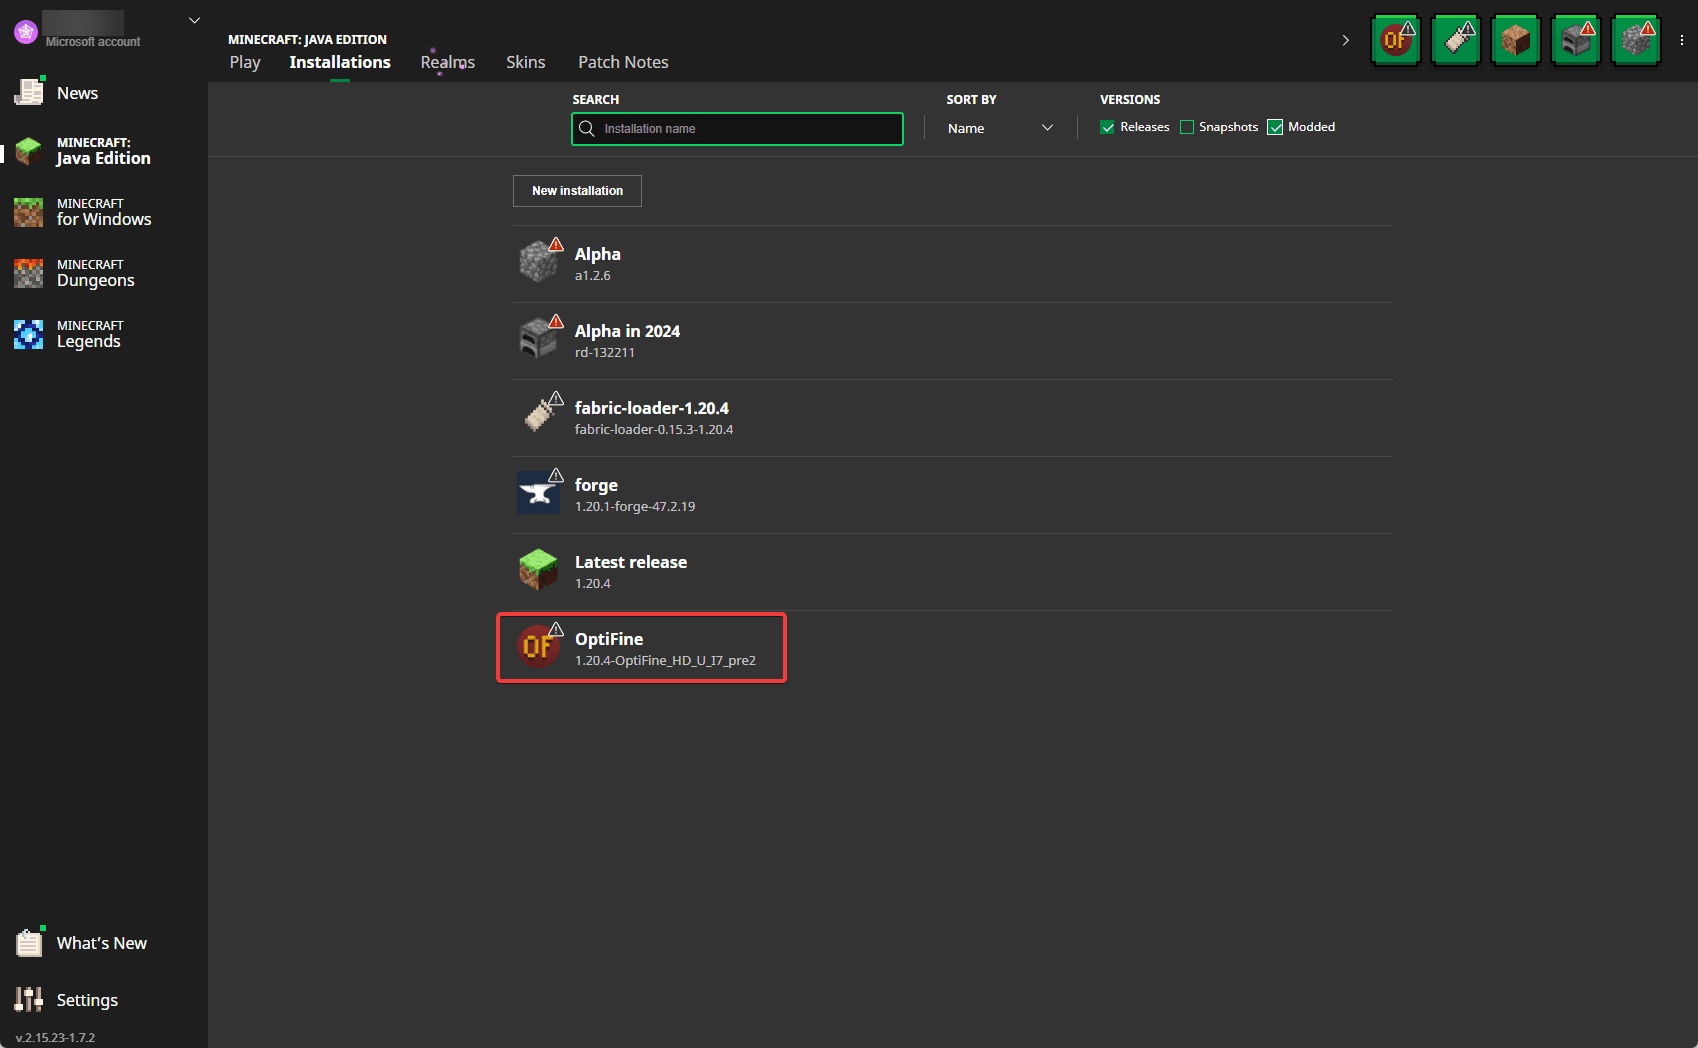
Click the Installations Tab in your Minecraft Launcher.
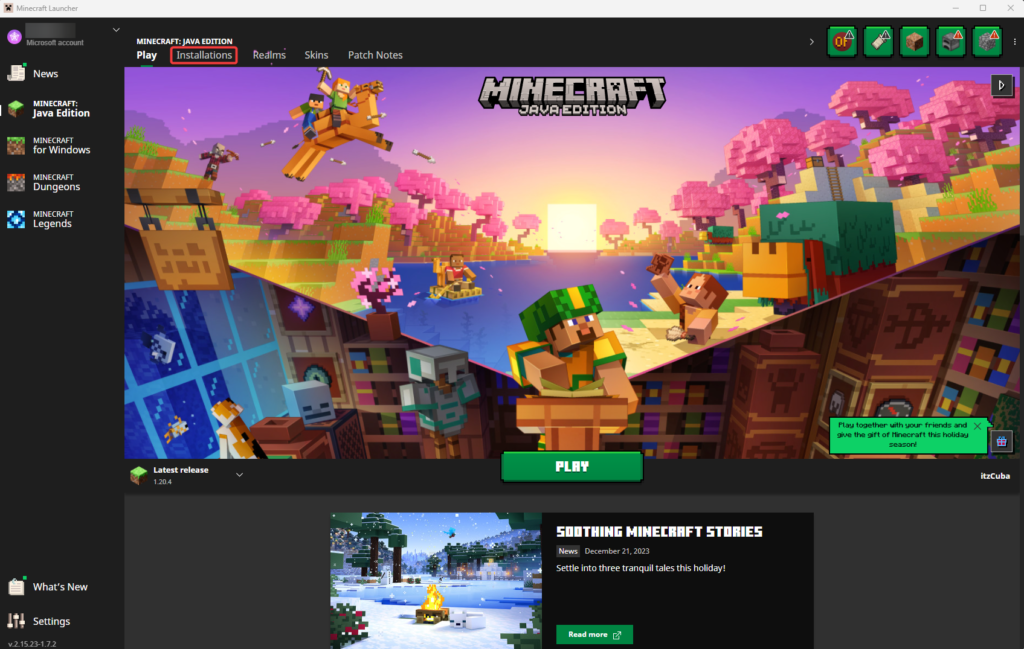
Within your Installations Tab, make sure that the modded option is selected, as if it is not, OptiFine for Minecraft will not show in your Minecraft Launcher.
How to Create a New Installation of OptiFine in your Minecraft Launcher
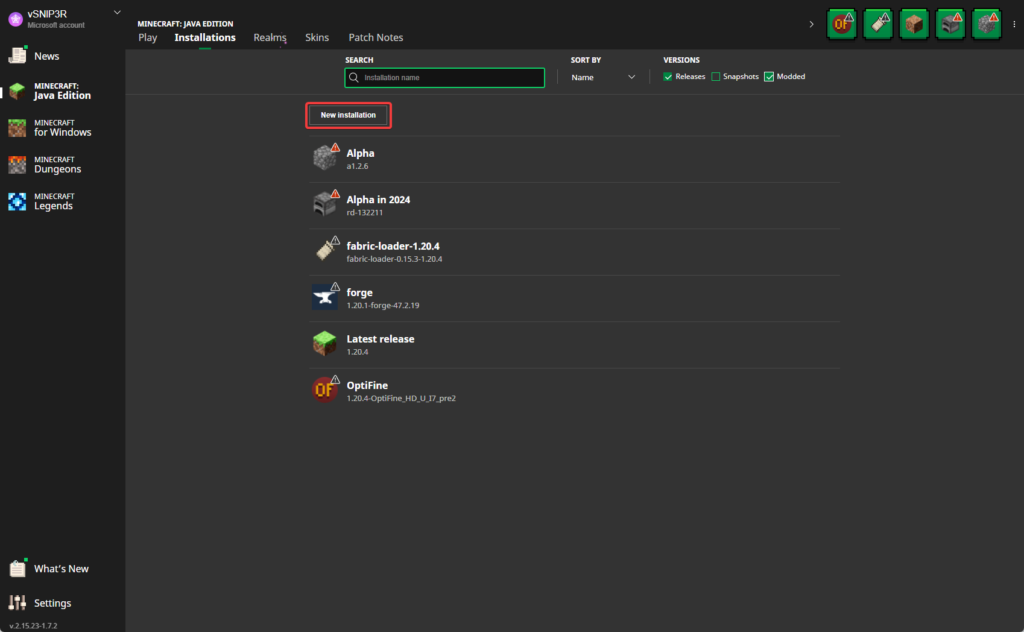
Let’s say that you did everything in the previous steps, and, OptiFine is still not showing. Well, there are still more things we can try.
If OptiFine is still not appearing for you. Click the “New Installation” button.
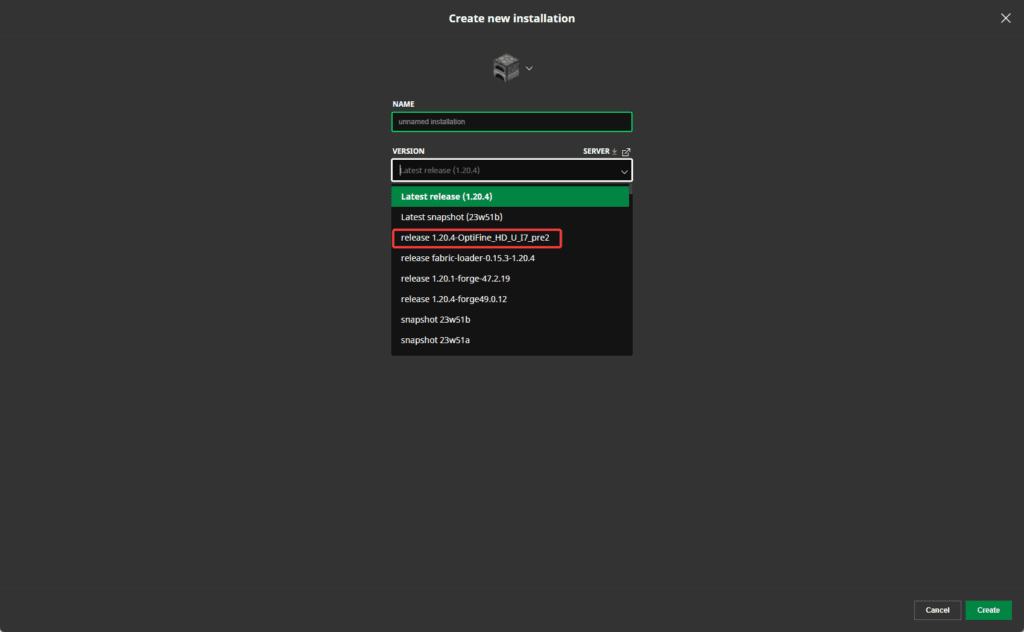
Where it says version, click the drop-down arrow.
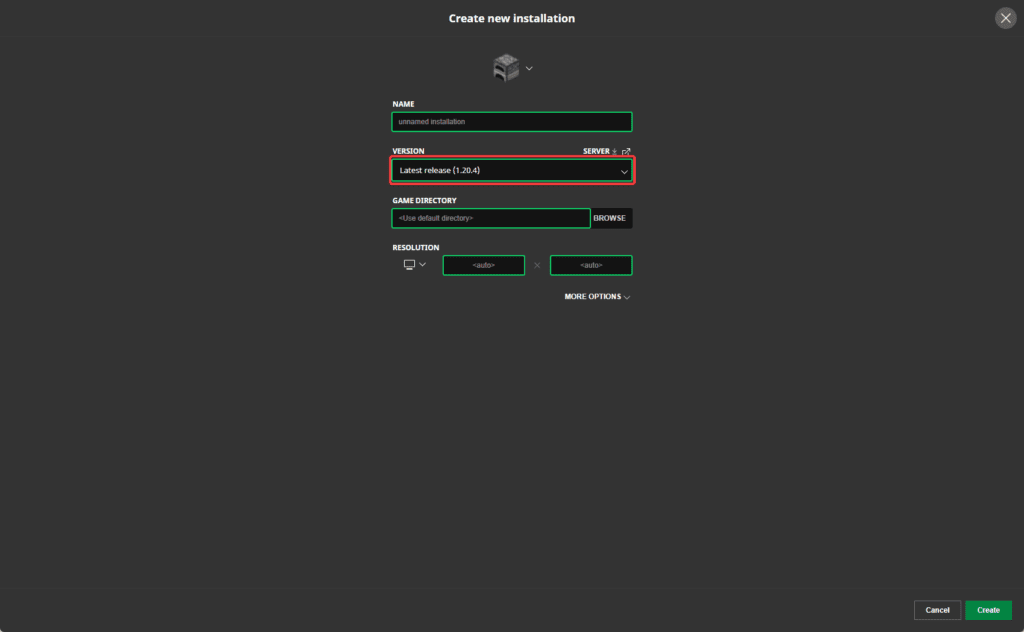
Now, select the OptiFine version we installed in step 2. You might have to scroll a bit before finding the OptiFine instance. Once you do, click on it.
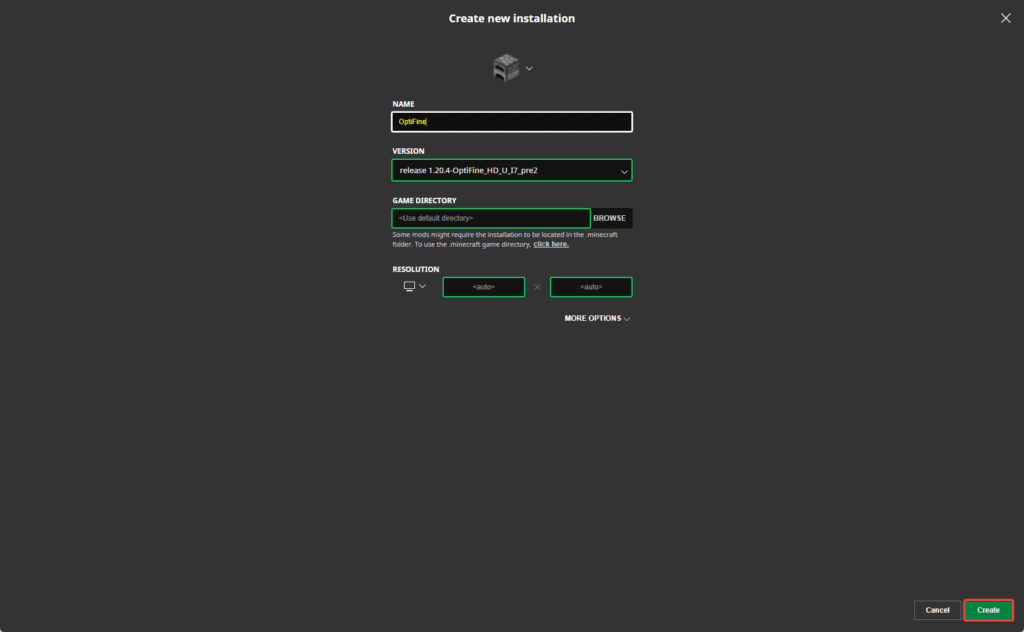
Name this instance or installation, whatever you want.
Click Create.
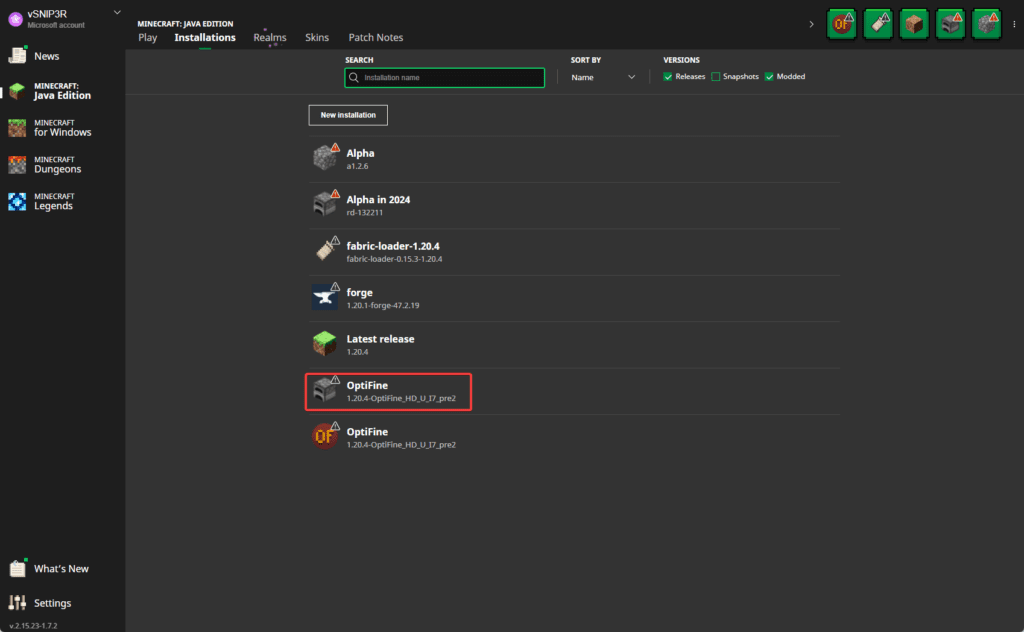
You should now see, the new OptiFine instance appear within your Installations tab. Click play next to it.
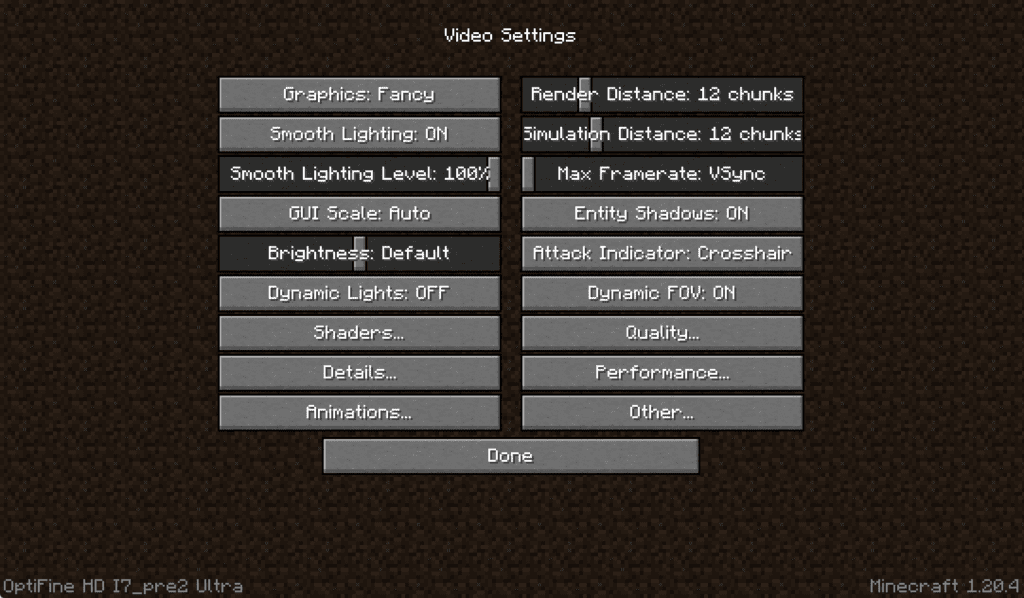
After we installed OptiFine properly and launched it. Head over to Minecraft’ video settings.
A different menu now shows. Feel free to play around with the settings or maybe add some shaders. We recommend that you use Complementary Unbound.
That is it, you now have OptiFine. Enjoy it!
Posts You Might Like
[{"id":2070,"link":"https:\/\/itzcubatutorials.com\/how-to-download-install-lukis-grand-capitals-mod-for-minecraft\/","name":"how-to-download-install-lukis-grand-capitals-mod-for-minecraft","thumbnail":{"url":"https:\/\/itzcubatutorials.com\/wp-content\/uploads\/2024\/08\/How-to-download-and-install-Lukis-Grand-Capitals-mod-for-Minecraft.webp","alt":"Learn how to install the Luki's Grand Capitals Mod for Minecraft in 2024."},"title":"How to Download & Install Luki's Grand Capitals mod for Minecraft","postMeta":[],"author":{"name":"Frank","link":"https:\/\/itzcubatutorials.com\/author\/admin\/"},"date":"Aug 4, 2024","dateGMT":"2024-08-04 17:43:56","modifiedDate":"2024-08-04 12:43:58","modifiedDateGMT":"2024-08-04 17:43:58","commentCount":"0","commentStatus":"closed","categories":{"coma":"<a href=\"https:\/\/itzcubatutorials.com\/category\/vlogs\/\" rel=\"category tag\">Vlogs<\/a>","space":"<a href=\"https:\/\/itzcubatutorials.com\/category\/vlogs\/\" rel=\"category tag\">Vlogs<\/a>"},"taxonomies":{"post_tag":""},"readTime":{"min":2,"sec":47},"status":"publish","excerpt":"Learn how to download and install the Luki's Grand Capitals mod for Minecraft. This mod will change your exploring experience forever."},{"id":2056,"link":"https:\/\/itzcubatutorials.com\/how-to-install-the-multimc-launcher-for-minecraft\/","name":"how-to-install-the-multimc-launcher-for-minecraft","thumbnail":{"url":"https:\/\/itzcubatutorials.com\/wp-content\/uploads\/2024\/08\/How-to-download-and-install-the-MultiMC-Launcher-for-Minecraft.webp","alt":"Learn how to download and install the MultiMC Launcher for Minecraft with this easy step-by-step guide."},"title":"How to Install the MultiMC Launcher for Minecraft","postMeta":[],"author":{"name":"Frank","link":"https:\/\/itzcubatutorials.com\/author\/admin\/"},"date":"Aug 3, 2024","dateGMT":"2024-08-04 00:22:43","modifiedDate":"2024-08-03 19:22:45","modifiedDateGMT":"2024-08-04 00:22:45","commentCount":"0","commentStatus":"closed","categories":{"coma":"<a href=\"https:\/\/itzcubatutorials.com\/category\/minecraft\/\" rel=\"category tag\">Minecraft<\/a>","space":"<a href=\"https:\/\/itzcubatutorials.com\/category\/minecraft\/\" rel=\"category tag\">Minecraft<\/a>"},"taxonomies":{"post_tag":""},"readTime":{"min":3,"sec":11},"status":"publish","excerpt":"Learn how to download and install the MultiMC Launcher for Minecraft, as well as how to set up and use the MultiMC Launcher."},{"id":2050,"link":"https:\/\/itzcubatutorials.com\/how-to-redeem-once-human-codes-for-august-2024\/","name":"how-to-redeem-once-human-codes-for-august-2024","thumbnail":{"url":"https:\/\/itzcubatutorials.com\/wp-content\/uploads\/2024\/08\/How-to-Redeem-Codes-in-Once-Human-codes-for-august-2024.webp","alt":"Learn How to Redeem all the working Codes in Once Human codes for august 2024 with this easy guide"},"title":"How to Redeem Once Human Codes for August 2024","postMeta":[],"author":{"name":"Frank","link":"https:\/\/itzcubatutorials.com\/author\/admin\/"},"date":"Aug 1, 2024","dateGMT":"2024-08-01 23:45:21","modifiedDate":"2024-08-01 18:45:24","modifiedDateGMT":"2024-08-01 23:45:24","commentCount":"0","commentStatus":"closed","categories":{"coma":"<a href=\"https:\/\/itzcubatutorials.com\/category\/vlogs\/\" rel=\"category tag\">Vlogs<\/a>","space":"<a href=\"https:\/\/itzcubatutorials.com\/category\/vlogs\/\" rel=\"category tag\">Vlogs<\/a>"},"taxonomies":{"post_tag":""},"readTime":{"min":1,"sec":14},"status":"publish","excerpt":"Redeem all the working codes in Once Human for the August month in 2024. We put all the codes together for you!"},{"id":2038,"link":"https:\/\/itzcubatutorials.com\/how-to-make-a-minecraft-modpack-using-curseforge\/","name":"how-to-make-a-minecraft-modpack-using-curseforge","thumbnail":{"url":"https:\/\/itzcubatutorials.com\/wp-content\/uploads\/2024\/08\/Create-a-custom-Minecraft-modpack-using-the-curseforge-launcher.webp","alt":"Learn how to Create a custom Minecraft modpack using the curseforge launcher."},"title":"How to Make a Custom Minecraft Modpack using CurseForge","postMeta":[],"author":{"name":"Frank","link":"https:\/\/itzcubatutorials.com\/author\/admin\/"},"date":"Aug 1, 2024","dateGMT":"2024-08-01 21:56:48","modifiedDate":"2024-08-01 16:57:33","modifiedDateGMT":"2024-08-01 21:57:33","commentCount":"0","commentStatus":"closed","categories":{"coma":"<a href=\"https:\/\/itzcubatutorials.com\/category\/minecraft\/\" rel=\"category tag\">Minecraft<\/a>, <a href=\"https:\/\/itzcubatutorials.com\/category\/minecraft\/modpacks\/\" rel=\"category tag\">Modpacks<\/a>","space":"<a href=\"https:\/\/itzcubatutorials.com\/category\/minecraft\/\" rel=\"category tag\">Minecraft<\/a> <a href=\"https:\/\/itzcubatutorials.com\/category\/minecraft\/modpacks\/\" rel=\"category tag\">Modpacks<\/a>"},"taxonomies":{"post_tag":""},"readTime":{"min":2,"sec":26},"status":"publish","excerpt":"Learn how to make a Custom Minecraft Modpack with this simple step-by-step guide. All your mods together in one place!"},{"id":1998,"link":"https:\/\/itzcubatutorials.com\/how-to-update-old-texture-packs-in-minecraft\/","name":"how-to-update-old-texture-packs-in-minecraft","thumbnail":{"url":"https:\/\/itzcubatutorials.com\/wp-content\/uploads\/2024\/07\/How-to-update-old-texture-packs-in-Minecraft-to-newer-Minecraft-versions.webp","alt":"How to Update a Minecraft Resource pack or a texture pack to be compatible with newer Minecraft Versions."},"title":"How to Update Old Texture Packs to Newer Minecraft Versions","postMeta":[],"author":{"name":"Frank","link":"https:\/\/itzcubatutorials.com\/author\/admin\/"},"date":"Jul 18, 2024","dateGMT":"2024-07-18 20:30:51","modifiedDate":"2024-07-28 21:28:50","modifiedDateGMT":"2024-07-29 02:28:50","commentCount":"0","commentStatus":"closed","categories":{"coma":"<a href=\"https:\/\/itzcubatutorials.com\/category\/minecraft\/\" rel=\"category tag\">Minecraft<\/a>, <a href=\"https:\/\/itzcubatutorials.com\/category\/minecraft\/texture-packs\/\" rel=\"category tag\">Texture Packs<\/a>","space":"<a href=\"https:\/\/itzcubatutorials.com\/category\/minecraft\/\" rel=\"category tag\">Minecraft<\/a> <a href=\"https:\/\/itzcubatutorials.com\/category\/minecraft\/texture-packs\/\" rel=\"category tag\">Texture Packs<\/a>"},"taxonomies":{"post_tag":""},"readTime":{"min":2,"sec":1},"status":"publish","excerpt":"Learn how to update old texture packs or resource packs to make them compatible with newer releases of Minecraft."},{"id":1967,"link":"https:\/\/itzcubatutorials.com\/texture-packs-you-should-try-in-minecraft\/","name":"texture-packs-you-should-try-in-minecraft","thumbnail":{"url":"https:\/\/itzcubatutorials.com\/wp-content\/uploads\/2024\/07\/Top-texture-packs-and-resource-packs-for-Minecraft-Java.webp","alt":"Here is a list of the Top texture packs and resource packs for Minecraft Java"},"title":"Texture Packs you should try in Minecraft","postMeta":[],"author":{"name":"Frank","link":"https:\/\/itzcubatutorials.com\/author\/admin\/"},"date":"Jul 1, 2024","dateGMT":"2024-07-01 22:49:52","modifiedDate":"2024-07-28 21:45:05","modifiedDateGMT":"2024-07-29 02:45:05","commentCount":"0","commentStatus":"closed","categories":{"coma":"<a href=\"https:\/\/itzcubatutorials.com\/category\/minecraft\/\" rel=\"category tag\">Minecraft<\/a>, <a href=\"https:\/\/itzcubatutorials.com\/category\/minecraft\/texture-packs\/\" rel=\"category tag\">Texture Packs<\/a>","space":"<a href=\"https:\/\/itzcubatutorials.com\/category\/minecraft\/\" rel=\"category tag\">Minecraft<\/a> <a href=\"https:\/\/itzcubatutorials.com\/category\/minecraft\/texture-packs\/\" rel=\"category tag\">Texture Packs<\/a>"},"taxonomies":{"post_tag":""},"readTime":{"min":3,"sec":11},"status":"publish","excerpt":"Discover the best Minecraft texture packs for 2024! Enhance your game with Dark Mode, Bare Bones, Faithful, and more."},{"id":1983,"link":"https:\/\/itzcubatutorials.com\/how-to-download-and-install-the-ore-excavation-mod-for-minecraft\/","name":"how-to-download-and-install-the-ore-excavation-mod-for-minecraft","thumbnail":{"url":"https:\/\/itzcubatutorials.com\/wp-content\/uploads\/2024\/06\/Learn-how-to-install-the-ore-excavation-mod-or-veinminer-mod-for-Minecraft-Java.webp","alt":"Learn how to download and install the Ore Excavation or Vain Miner for Minecraft java"},"title":"How to Download & Install the Ore Excavation mod for Minecraft","postMeta":[],"author":{"name":"Frank","link":"https:\/\/itzcubatutorials.com\/author\/admin\/"},"date":"Jun 29, 2024","dateGMT":"2024-06-29 23:19:13","modifiedDate":"2024-07-29 14:10:59","modifiedDateGMT":"2024-07-29 19:10:59","commentCount":"0","commentStatus":"closed","categories":{"coma":"<a href=\"https:\/\/itzcubatutorials.com\/category\/minecraft\/\" rel=\"category tag\">Minecraft<\/a>, <a href=\"https:\/\/itzcubatutorials.com\/category\/minecraft\/mods\/\" rel=\"category tag\">Mods<\/a>","space":"<a href=\"https:\/\/itzcubatutorials.com\/category\/minecraft\/\" rel=\"category tag\">Minecraft<\/a> <a href=\"https:\/\/itzcubatutorials.com\/category\/minecraft\/mods\/\" rel=\"category tag\">Mods<\/a>"},"taxonomies":{"post_tag":""},"readTime":{"min":2,"sec":18},"status":"publish","excerpt":"Easily download and install the Ore Excavation mod for Minecraft to effortlessly mine entire ore veins, cut down trees, and perform bulk harvesting actions, enhancing your gameplay experience with customizable features."},{"id":1754,"link":"https:\/\/itzcubatutorials.com\/top-10-minecraft-gun-mods\/","name":"top-10-minecraft-gun-mods","thumbnail":{"url":"https:\/\/itzcubatutorials.com\/wp-content\/uploads\/2024\/06\/Top-10-Best-gun-mods-for-Minecraft-Java.webp","alt":"Top 10 Best gun mods to install and play with guns in Minecraft Java"},"title":"Top 10 Minecraft Gun Mods","postMeta":[],"author":{"name":"Frank","link":"https:\/\/itzcubatutorials.com\/author\/admin\/"},"date":"Jun 12, 2024","dateGMT":"2024-06-12 21:49:48","modifiedDate":"2024-07-29 14:04:09","modifiedDateGMT":"2024-07-29 19:04:09","commentCount":"0","commentStatus":"closed","categories":{"coma":"<a href=\"https:\/\/itzcubatutorials.com\/category\/minecraft\/\" rel=\"category tag\">Minecraft<\/a>, <a href=\"https:\/\/itzcubatutorials.com\/category\/minecraft\/mods\/\" rel=\"category tag\">Mods<\/a>, <a href=\"https:\/\/itzcubatutorials.com\/category\/vlogs\/\" rel=\"category tag\">Vlogs<\/a>","space":"<a href=\"https:\/\/itzcubatutorials.com\/category\/minecraft\/\" rel=\"category tag\">Minecraft<\/a> <a href=\"https:\/\/itzcubatutorials.com\/category\/minecraft\/mods\/\" rel=\"category tag\">Mods<\/a> <a href=\"https:\/\/itzcubatutorials.com\/category\/vlogs\/\" rel=\"category tag\">Vlogs<\/a>"},"taxonomies":{"post_tag":""},"readTime":{"min":5,"sec":36},"status":"publish","excerpt":"Explore the top 10 Minecraft gun mods, from simple to advanced, transforming gameplay with unique weapons, thrilling battles, and much more!"},{"id":1891,"link":"https:\/\/itzcubatutorials.com\/bare-bones-texture-pack\/","name":"bare-bones-texture-pack","thumbnail":{"url":"https:\/\/itzcubatutorials.com\/wp-content\/uploads\/2024\/06\/How-to-install-the-bare-bones-texture-packs-in-Minecraft-Java.webp","alt":"Learn how to download and install the bare bones texture pack for minecraft to make minecraft look like the minecraft trailer."},"title":"Bare Bones Texture Pack 1.21, 1.20.6, 1.19.4...","postMeta":[],"author":{"name":"Frank","link":"https:\/\/itzcubatutorials.com\/author\/admin\/"},"date":"Jun 5, 2024","dateGMT":"2024-06-05 06:55:38","modifiedDate":"2024-07-29 14:07:30","modifiedDateGMT":"2024-07-29 19:07:30","commentCount":"0","commentStatus":"closed","categories":{"coma":"<a href=\"https:\/\/itzcubatutorials.com\/category\/minecraft\/\" rel=\"category tag\">Minecraft<\/a>, <a href=\"https:\/\/itzcubatutorials.com\/category\/minecraft\/texture-packs\/\" rel=\"category tag\">Texture Packs<\/a>","space":"<a href=\"https:\/\/itzcubatutorials.com\/category\/minecraft\/\" rel=\"category tag\">Minecraft<\/a> <a href=\"https:\/\/itzcubatutorials.com\/category\/minecraft\/texture-packs\/\" rel=\"category tag\">Texture Packs<\/a>"},"taxonomies":{"post_tag":""},"readTime":{"min":2,"sec":40},"status":"publish","excerpt":"Discover the minimalist charm of the Bare Bones texture pack for Minecraft. Learn how to download, install, and enhance your game."},{"id":1881,"link":"https:\/\/itzcubatutorials.com\/how-to-download-install-menyoo-2-0-for-gta-5\/","name":"how-to-download-install-menyoo-2-0-for-gta-5","thumbnail":{"url":"https:\/\/itzcubatutorials.com\/wp-content\/uploads\/2024\/05\/How-to-Download-Install-Menyoo-2.0-for-GTA-5.webp","alt":"How to download and install Menyoo 2.0 for GTA 5"},"title":"How to Download & Install Menyoo 2.0 for GTA 5","postMeta":[],"author":{"name":"Frank","link":"https:\/\/itzcubatutorials.com\/author\/admin\/"},"date":"May 23, 2024","dateGMT":"2024-05-23 22:26:59","modifiedDate":"2024-07-29 14:14:53","modifiedDateGMT":"2024-07-29 19:14:53","commentCount":"0","commentStatus":"closed","categories":{"coma":"<a href=\"https:\/\/itzcubatutorials.com\/category\/games\/gta-v\/\" rel=\"category tag\">GTA V<\/a>","space":"<a href=\"https:\/\/itzcubatutorials.com\/category\/games\/gta-v\/\" rel=\"category tag\">GTA V<\/a>"},"taxonomies":{"post_tag":""},"readTime":{"min":1,"sec":47},"status":"publish","excerpt":"Unlock the full potential of GTA 5 with Menyoo 2.0! This guide will walk you through the steps to download and install the latest version of Menyoo, enhancing your gameplay with advanced features and customization options. Dive into the world of mods and elevate your gaming experience today."},{"id":1864,"link":"https:\/\/itzcubatutorials.com\/roaring-kitty-ignites-gamestop-frenzy-stock-soars-and-shorts-scramble-as-meme-legend-returns\/","name":"roaring-kitty-ignites-gamestop-frenzy-stock-soars-and-shorts-scramble-as-meme-legend-returns","thumbnail":{"url":"https:\/\/itzcubatutorials.com\/wp-content\/uploads\/2024\/05\/image-1.png","alt":""},"title":"Roaring Kitty Ignites GameStop Frenzy: Stock Soars and Shorts Scramble as Meme Legend Returns!","postMeta":[],"author":{"name":"Frank","link":"https:\/\/itzcubatutorials.com\/author\/admin\/"},"date":"May 13, 2024","dateGMT":"2024-05-13 18:24:17","modifiedDate":"2024-05-13 13:24:25","modifiedDateGMT":"2024-05-13 18:24:25","commentCount":"0","commentStatus":"closed","categories":{"coma":"<a href=\"https:\/\/itzcubatutorials.com\/category\/finance\/\" rel=\"category tag\">Finance<\/a>","space":"<a href=\"https:\/\/itzcubatutorials.com\/category\/finance\/\" rel=\"category tag\">Finance<\/a>"},"taxonomies":{"post_tag":""},"readTime":{"min":1,"sec":0},"status":"publish","excerpt":"Explore how Roaring Kitty's comeback ignited a GameStop stock frenzy, impacting market dynamics and highlighting the power of social media in trading."},{"id":1851,"link":"https:\/\/itzcubatutorials.com\/how-to-download-and-install-java-21-jdk-21\/","name":"how-to-download-and-install-java-21-jdk-21","thumbnail":{"url":"https:\/\/itzcubatutorials.com\/wp-content\/uploads\/2024\/05\/1.jpg","alt":"Java 21 Install Guide"},"title":"How to Download & Install Java 21 (JDK 21)","postMeta":[],"author":{"name":"Frank","link":"https:\/\/itzcubatutorials.com\/author\/admin\/"},"date":"May 6, 2024","dateGMT":"2024-05-06 23:16:51","modifiedDate":"2025-03-17 17:22:06","modifiedDateGMT":"2025-03-17 23:22:06","commentCount":"0","commentStatus":"closed","categories":{"coma":"<a href=\"https:\/\/itzcubatutorials.com\/category\/software\/java\/\" rel=\"category tag\">Java<\/a>, <a href=\"https:\/\/itzcubatutorials.com\/category\/software\/\" rel=\"category tag\">Software<\/a>","space":"<a href=\"https:\/\/itzcubatutorials.com\/category\/software\/java\/\" rel=\"category tag\">Java<\/a> <a href=\"https:\/\/itzcubatutorials.com\/category\/software\/\" rel=\"category tag\">Software<\/a>"},"taxonomies":{"post_tag":""},"readTime":{"min":1,"sec":33},"status":"publish","excerpt":"Guide to Install Java 21 JDK on Windows 10 and 11: Download, Setup, Environment Variables, First Program, Tutorial Steps"}]