Before Downloading & Installing Kappa Shaders
Kappa Shaders are one of the most realistic shaders for Minecraft. Made by RRe36, the maker of multiple shaders like, Nostalgia Shader, Vanilla Plus Shader, and others.
Requirements:
- Optifine 1.16 and newer or Iris 1.5.0 and newer
- GTX 1050/RX 560 or equal/better (has to support OpenGL 4.0, something faster is recommended)
- Windows/Linux
- Intel HD 5000 Graphics and older are NOT supported!
Guide
Step 1 – How to Download Kappa Shader
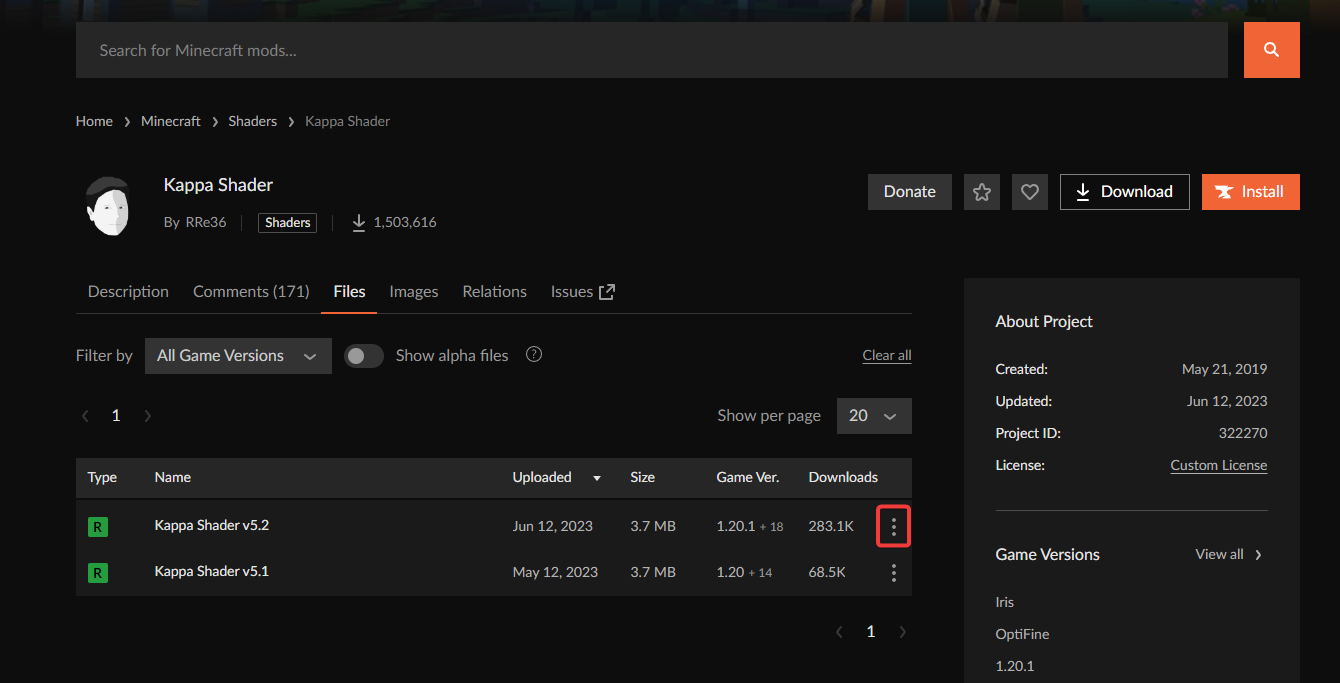
Go ahead and click the button in the right to be redirected to the download page for Kappa Shaders.

Now click the three dots next to your desired version of Kappa Shaders, for this guide we will be downloading the most recent version which is compatible with the newer Minecraft.
Then click Download File to begin the download of Kappa Shader for Minecraft.
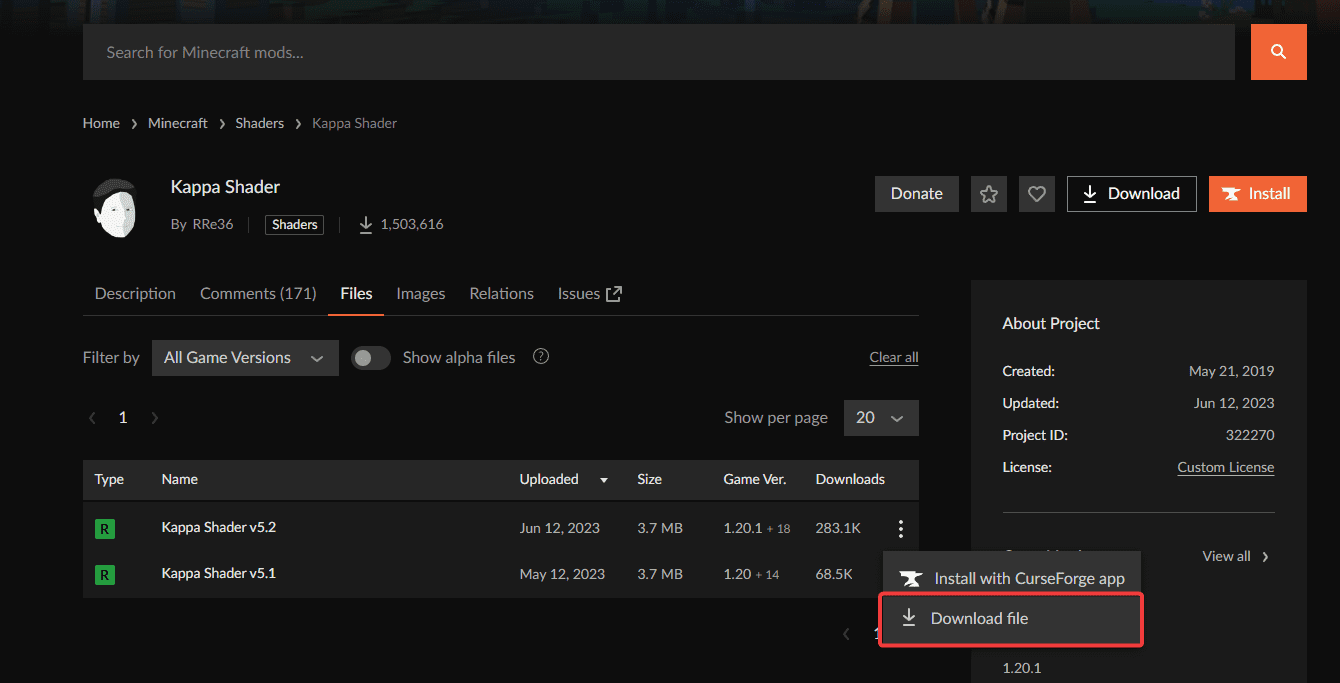
You now have to wait five seconds for your download to begin, just wait, don’t click anything.

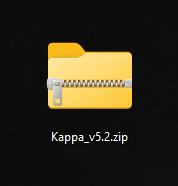
You will now see the Kappa Shader file in your Recent download history, drag this file to the desktop or locate it in your Downloads folder.

Step 2 – How to Install Kappa Shader
After we downloaded Kappa Shader in the previous step, we are going to add to Minecraft.
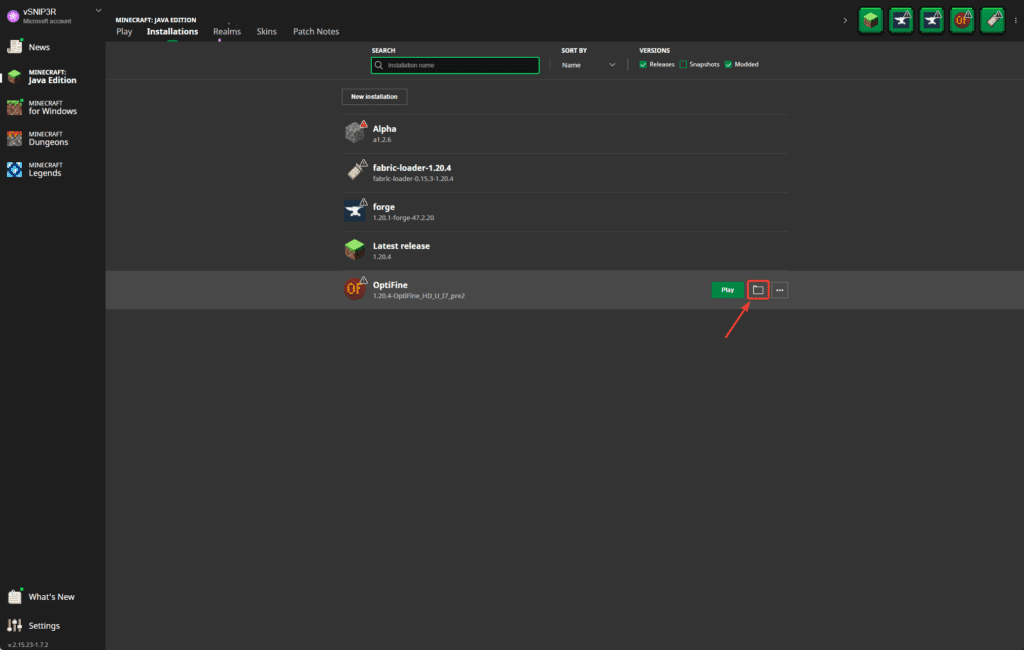
Open your Minecraft Launcher and head over to the Installations Tab.
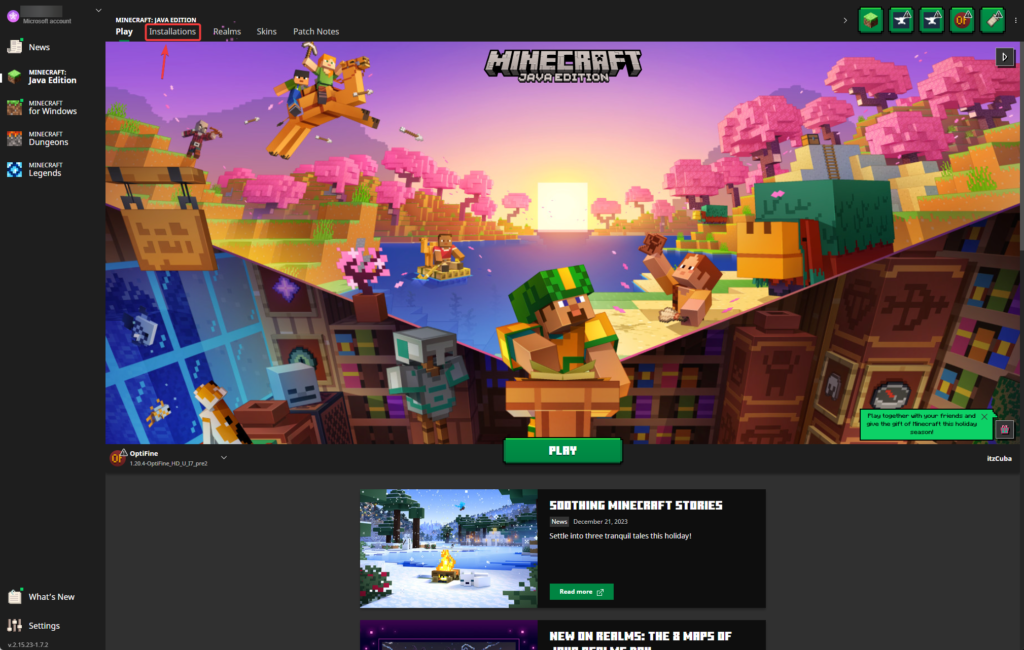
Hover over of either Iris or Optifine, for this guide we are going to use Optifine, but it does not make a difference, since Kappa Shader is compatible with both.
Click the folder icon.
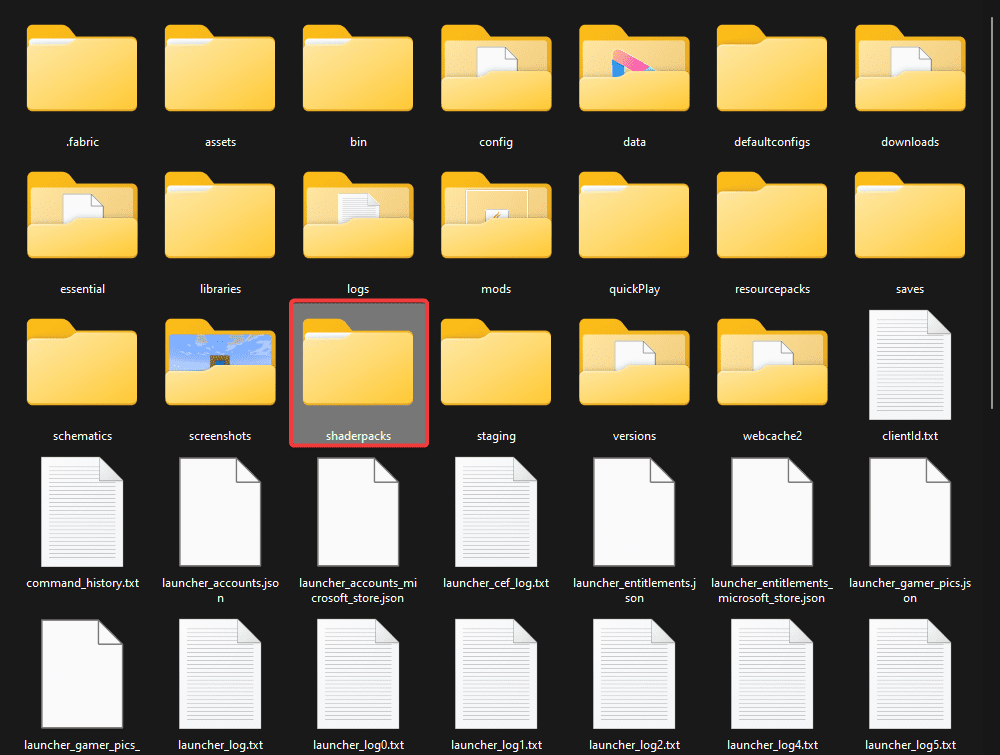
Now, open the folder called “shaderpacks” if this folder does not exist, create it.
(To create a new folder just right click, press new, and name it “shaderpacks”)
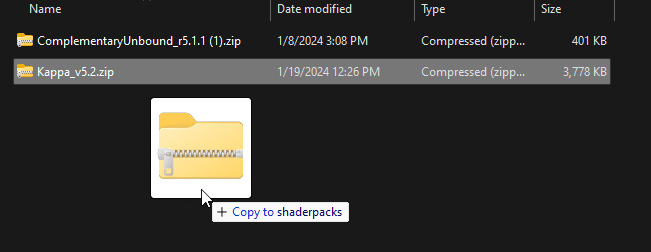
Drag and drop the Kappa Shader file into this shaderpacks folder. Head back to your Minecraft Launcher and launch your shader loader. (Optifine or Iris)
You should be able to see your Kappa Shader within your Shader Packs settings in Minecraft.
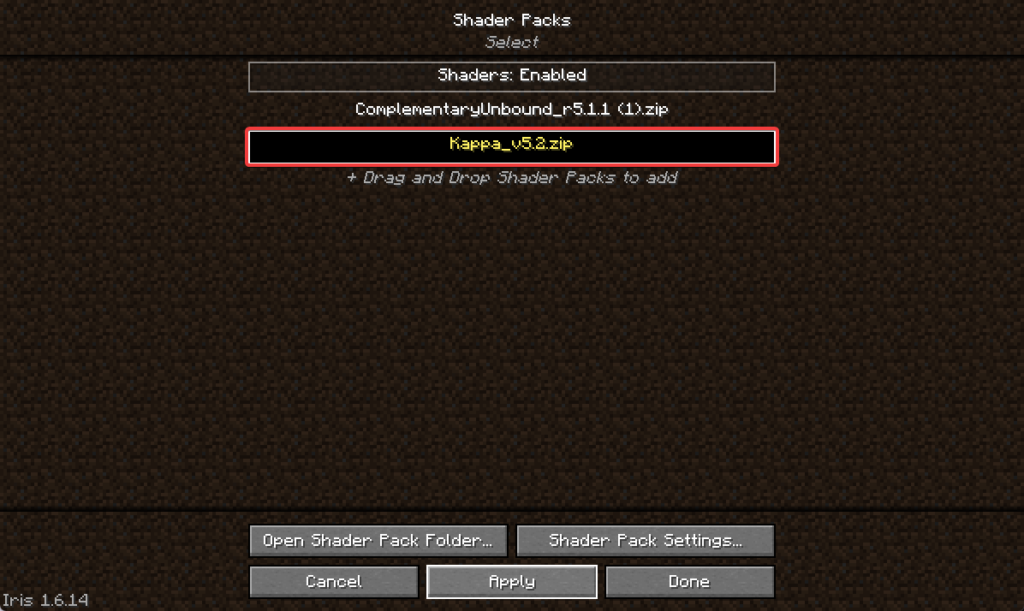
That is it, you now have Kappa Shader working in Minecraft.
Posts You Might Like
[{"id":2070,"link":"https:\/\/itzcubatutorials.com\/how-to-download-install-lukis-grand-capitals-mod-for-minecraft\/","name":"how-to-download-install-lukis-grand-capitals-mod-for-minecraft","thumbnail":{"url":"https:\/\/itzcubatutorials.com\/wp-content\/uploads\/2024\/08\/How-to-download-and-install-Lukis-Grand-Capitals-mod-for-Minecraft.webp","alt":"Learn how to install the Luki's Grand Capitals Mod for Minecraft in 2024."},"title":"How to Download & Install Luki's Grand Capitals mod for Minecraft","postMeta":[],"author":{"name":"Frank","link":"https:\/\/itzcubatutorials.com\/author\/admin\/"},"date":"Aug 4, 2024","dateGMT":"2024-08-04 17:43:56","modifiedDate":"2024-08-04 12:43:58","modifiedDateGMT":"2024-08-04 17:43:58","commentCount":"0","commentStatus":"closed","categories":{"coma":"<a href=\"https:\/\/itzcubatutorials.com\/category\/vlogs\/\" rel=\"category tag\">Vlogs<\/a>","space":"<a href=\"https:\/\/itzcubatutorials.com\/category\/vlogs\/\" rel=\"category tag\">Vlogs<\/a>"},"taxonomies":{"post_tag":""},"readTime":{"min":2,"sec":47},"status":"publish","excerpt":"Learn how to download and install the Luki's Grand Capitals mod for Minecraft. This mod will change your exploring experience forever."},{"id":2056,"link":"https:\/\/itzcubatutorials.com\/how-to-install-the-multimc-launcher-for-minecraft\/","name":"how-to-install-the-multimc-launcher-for-minecraft","thumbnail":{"url":"https:\/\/itzcubatutorials.com\/wp-content\/uploads\/2024\/08\/How-to-download-and-install-the-MultiMC-Launcher-for-Minecraft.webp","alt":"Learn how to download and install the MultiMC Launcher for Minecraft with this easy step-by-step guide."},"title":"How to Install the MultiMC Launcher for Minecraft","postMeta":[],"author":{"name":"Frank","link":"https:\/\/itzcubatutorials.com\/author\/admin\/"},"date":"Aug 3, 2024","dateGMT":"2024-08-04 00:22:43","modifiedDate":"2024-08-03 19:22:45","modifiedDateGMT":"2024-08-04 00:22:45","commentCount":"0","commentStatus":"closed","categories":{"coma":"<a href=\"https:\/\/itzcubatutorials.com\/category\/minecraft\/\" rel=\"category tag\">Minecraft<\/a>","space":"<a href=\"https:\/\/itzcubatutorials.com\/category\/minecraft\/\" rel=\"category tag\">Minecraft<\/a>"},"taxonomies":{"post_tag":""},"readTime":{"min":3,"sec":11},"status":"publish","excerpt":"Learn how to download and install the MultiMC Launcher for Minecraft, as well as how to set up and use the MultiMC Launcher."},{"id":2050,"link":"https:\/\/itzcubatutorials.com\/how-to-redeem-once-human-codes-for-august-2024\/","name":"how-to-redeem-once-human-codes-for-august-2024","thumbnail":{"url":"https:\/\/itzcubatutorials.com\/wp-content\/uploads\/2024\/08\/How-to-Redeem-Codes-in-Once-Human-codes-for-august-2024.webp","alt":"Learn How to Redeem all the working Codes in Once Human codes for august 2024 with this easy guide"},"title":"How to Redeem Once Human Codes for August 2024","postMeta":[],"author":{"name":"Frank","link":"https:\/\/itzcubatutorials.com\/author\/admin\/"},"date":"Aug 1, 2024","dateGMT":"2024-08-01 23:45:21","modifiedDate":"2024-08-01 18:45:24","modifiedDateGMT":"2024-08-01 23:45:24","commentCount":"0","commentStatus":"closed","categories":{"coma":"<a href=\"https:\/\/itzcubatutorials.com\/category\/vlogs\/\" rel=\"category tag\">Vlogs<\/a>","space":"<a href=\"https:\/\/itzcubatutorials.com\/category\/vlogs\/\" rel=\"category tag\">Vlogs<\/a>"},"taxonomies":{"post_tag":""},"readTime":{"min":1,"sec":14},"status":"publish","excerpt":"Redeem all the working codes in Once Human for the August month in 2024. We put all the codes together for you!"},{"id":2038,"link":"https:\/\/itzcubatutorials.com\/how-to-make-a-minecraft-modpack-using-curseforge\/","name":"how-to-make-a-minecraft-modpack-using-curseforge","thumbnail":{"url":"https:\/\/itzcubatutorials.com\/wp-content\/uploads\/2024\/08\/Create-a-custom-Minecraft-modpack-using-the-curseforge-launcher.webp","alt":"Learn how to Create a custom Minecraft modpack using the curseforge launcher."},"title":"How to Make a Custom Minecraft Modpack using CurseForge","postMeta":[],"author":{"name":"Frank","link":"https:\/\/itzcubatutorials.com\/author\/admin\/"},"date":"Aug 1, 2024","dateGMT":"2024-08-01 21:56:48","modifiedDate":"2024-08-01 16:57:33","modifiedDateGMT":"2024-08-01 21:57:33","commentCount":"0","commentStatus":"closed","categories":{"coma":"<a href=\"https:\/\/itzcubatutorials.com\/category\/minecraft\/\" rel=\"category tag\">Minecraft<\/a>, <a href=\"https:\/\/itzcubatutorials.com\/category\/minecraft\/modpacks\/\" rel=\"category tag\">Modpacks<\/a>","space":"<a href=\"https:\/\/itzcubatutorials.com\/category\/minecraft\/\" rel=\"category tag\">Minecraft<\/a> <a href=\"https:\/\/itzcubatutorials.com\/category\/minecraft\/modpacks\/\" rel=\"category tag\">Modpacks<\/a>"},"taxonomies":{"post_tag":""},"readTime":{"min":2,"sec":26},"status":"publish","excerpt":"Learn how to make a Custom Minecraft Modpack with this simple step-by-step guide. All your mods together in one place!"},{"id":1998,"link":"https:\/\/itzcubatutorials.com\/how-to-update-old-texture-packs-in-minecraft\/","name":"how-to-update-old-texture-packs-in-minecraft","thumbnail":{"url":"https:\/\/itzcubatutorials.com\/wp-content\/uploads\/2024\/07\/How-to-update-old-texture-packs-in-Minecraft-to-newer-Minecraft-versions.webp","alt":"How to Update a Minecraft Resource pack or a texture pack to be compatible with newer Minecraft Versions."},"title":"How to Update Old Texture Packs to Newer Minecraft Versions","postMeta":[],"author":{"name":"Frank","link":"https:\/\/itzcubatutorials.com\/author\/admin\/"},"date":"Jul 18, 2024","dateGMT":"2024-07-18 20:30:51","modifiedDate":"2024-07-28 21:28:50","modifiedDateGMT":"2024-07-29 02:28:50","commentCount":"0","commentStatus":"closed","categories":{"coma":"<a href=\"https:\/\/itzcubatutorials.com\/category\/minecraft\/\" rel=\"category tag\">Minecraft<\/a>, <a href=\"https:\/\/itzcubatutorials.com\/category\/minecraft\/texture-packs\/\" rel=\"category tag\">Texture Packs<\/a>","space":"<a href=\"https:\/\/itzcubatutorials.com\/category\/minecraft\/\" rel=\"category tag\">Minecraft<\/a> <a href=\"https:\/\/itzcubatutorials.com\/category\/minecraft\/texture-packs\/\" rel=\"category tag\">Texture Packs<\/a>"},"taxonomies":{"post_tag":""},"readTime":{"min":2,"sec":1},"status":"publish","excerpt":"Learn how to update old texture packs or resource packs to make them compatible with newer releases of Minecraft."},{"id":1967,"link":"https:\/\/itzcubatutorials.com\/texture-packs-you-should-try-in-minecraft\/","name":"texture-packs-you-should-try-in-minecraft","thumbnail":{"url":"https:\/\/itzcubatutorials.com\/wp-content\/uploads\/2024\/07\/Top-texture-packs-and-resource-packs-for-Minecraft-Java.webp","alt":"Here is a list of the Top texture packs and resource packs for Minecraft Java"},"title":"Texture Packs you should try in Minecraft","postMeta":[],"author":{"name":"Frank","link":"https:\/\/itzcubatutorials.com\/author\/admin\/"},"date":"Jul 1, 2024","dateGMT":"2024-07-01 22:49:52","modifiedDate":"2024-07-28 21:45:05","modifiedDateGMT":"2024-07-29 02:45:05","commentCount":"0","commentStatus":"closed","categories":{"coma":"<a href=\"https:\/\/itzcubatutorials.com\/category\/minecraft\/\" rel=\"category tag\">Minecraft<\/a>, <a href=\"https:\/\/itzcubatutorials.com\/category\/minecraft\/texture-packs\/\" rel=\"category tag\">Texture Packs<\/a>","space":"<a href=\"https:\/\/itzcubatutorials.com\/category\/minecraft\/\" rel=\"category tag\">Minecraft<\/a> <a href=\"https:\/\/itzcubatutorials.com\/category\/minecraft\/texture-packs\/\" rel=\"category tag\">Texture Packs<\/a>"},"taxonomies":{"post_tag":""},"readTime":{"min":3,"sec":11},"status":"publish","excerpt":"Discover the best Minecraft texture packs for 2024! Enhance your game with Dark Mode, Bare Bones, Faithful, and more."},{"id":1983,"link":"https:\/\/itzcubatutorials.com\/how-to-download-and-install-the-ore-excavation-mod-for-minecraft\/","name":"how-to-download-and-install-the-ore-excavation-mod-for-minecraft","thumbnail":{"url":"https:\/\/itzcubatutorials.com\/wp-content\/uploads\/2024\/06\/Learn-how-to-install-the-ore-excavation-mod-or-veinminer-mod-for-Minecraft-Java.webp","alt":"Learn how to download and install the Ore Excavation or Vain Miner for Minecraft java"},"title":"How to Download & Install the Ore Excavation mod for Minecraft","postMeta":[],"author":{"name":"Frank","link":"https:\/\/itzcubatutorials.com\/author\/admin\/"},"date":"Jun 29, 2024","dateGMT":"2024-06-29 23:19:13","modifiedDate":"2024-07-29 14:10:59","modifiedDateGMT":"2024-07-29 19:10:59","commentCount":"0","commentStatus":"closed","categories":{"coma":"<a href=\"https:\/\/itzcubatutorials.com\/category\/minecraft\/\" rel=\"category tag\">Minecraft<\/a>, <a href=\"https:\/\/itzcubatutorials.com\/category\/minecraft\/mods\/\" rel=\"category tag\">Mods<\/a>","space":"<a href=\"https:\/\/itzcubatutorials.com\/category\/minecraft\/\" rel=\"category tag\">Minecraft<\/a> <a href=\"https:\/\/itzcubatutorials.com\/category\/minecraft\/mods\/\" rel=\"category tag\">Mods<\/a>"},"taxonomies":{"post_tag":""},"readTime":{"min":2,"sec":18},"status":"publish","excerpt":"Easily download and install the Ore Excavation mod for Minecraft to effortlessly mine entire ore veins, cut down trees, and perform bulk harvesting actions, enhancing your gameplay experience with customizable features."},{"id":1754,"link":"https:\/\/itzcubatutorials.com\/top-10-minecraft-gun-mods\/","name":"top-10-minecraft-gun-mods","thumbnail":{"url":"https:\/\/itzcubatutorials.com\/wp-content\/uploads\/2024\/06\/Top-10-Best-gun-mods-for-Minecraft-Java.webp","alt":"Top 10 Best gun mods to install and play with guns in Minecraft Java"},"title":"Top 10 Minecraft Gun Mods","postMeta":[],"author":{"name":"Frank","link":"https:\/\/itzcubatutorials.com\/author\/admin\/"},"date":"Jun 12, 2024","dateGMT":"2024-06-12 21:49:48","modifiedDate":"2024-07-29 14:04:09","modifiedDateGMT":"2024-07-29 19:04:09","commentCount":"0","commentStatus":"closed","categories":{"coma":"<a href=\"https:\/\/itzcubatutorials.com\/category\/minecraft\/\" rel=\"category tag\">Minecraft<\/a>, <a href=\"https:\/\/itzcubatutorials.com\/category\/minecraft\/mods\/\" rel=\"category tag\">Mods<\/a>, <a href=\"https:\/\/itzcubatutorials.com\/category\/vlogs\/\" rel=\"category tag\">Vlogs<\/a>","space":"<a href=\"https:\/\/itzcubatutorials.com\/category\/minecraft\/\" rel=\"category tag\">Minecraft<\/a> <a href=\"https:\/\/itzcubatutorials.com\/category\/minecraft\/mods\/\" rel=\"category tag\">Mods<\/a> <a href=\"https:\/\/itzcubatutorials.com\/category\/vlogs\/\" rel=\"category tag\">Vlogs<\/a>"},"taxonomies":{"post_tag":""},"readTime":{"min":5,"sec":36},"status":"publish","excerpt":"Explore the top 10 Minecraft gun mods, from simple to advanced, transforming gameplay with unique weapons, thrilling battles, and much more!"},{"id":1891,"link":"https:\/\/itzcubatutorials.com\/bare-bones-texture-pack\/","name":"bare-bones-texture-pack","thumbnail":{"url":"https:\/\/itzcubatutorials.com\/wp-content\/uploads\/2024\/06\/How-to-install-the-bare-bones-texture-packs-in-Minecraft-Java.webp","alt":"Learn how to download and install the bare bones texture pack for minecraft to make minecraft look like the minecraft trailer."},"title":"Bare Bones Texture Pack 1.21, 1.20.6, 1.19.4...","postMeta":[],"author":{"name":"Frank","link":"https:\/\/itzcubatutorials.com\/author\/admin\/"},"date":"Jun 5, 2024","dateGMT":"2024-06-05 06:55:38","modifiedDate":"2024-07-29 14:07:30","modifiedDateGMT":"2024-07-29 19:07:30","commentCount":"0","commentStatus":"closed","categories":{"coma":"<a href=\"https:\/\/itzcubatutorials.com\/category\/minecraft\/\" rel=\"category tag\">Minecraft<\/a>, <a href=\"https:\/\/itzcubatutorials.com\/category\/minecraft\/texture-packs\/\" rel=\"category tag\">Texture Packs<\/a>","space":"<a href=\"https:\/\/itzcubatutorials.com\/category\/minecraft\/\" rel=\"category tag\">Minecraft<\/a> <a href=\"https:\/\/itzcubatutorials.com\/category\/minecraft\/texture-packs\/\" rel=\"category tag\">Texture Packs<\/a>"},"taxonomies":{"post_tag":""},"readTime":{"min":2,"sec":40},"status":"publish","excerpt":"Discover the minimalist charm of the Bare Bones texture pack for Minecraft. Learn how to download, install, and enhance your game."},{"id":1881,"link":"https:\/\/itzcubatutorials.com\/how-to-download-install-menyoo-2-0-for-gta-5\/","name":"how-to-download-install-menyoo-2-0-for-gta-5","thumbnail":{"url":"https:\/\/itzcubatutorials.com\/wp-content\/uploads\/2024\/05\/How-to-Download-Install-Menyoo-2.0-for-GTA-5.webp","alt":"How to download and install Menyoo 2.0 for GTA 5"},"title":"How to Download & Install Menyoo 2.0 for GTA 5","postMeta":[],"author":{"name":"Frank","link":"https:\/\/itzcubatutorials.com\/author\/admin\/"},"date":"May 23, 2024","dateGMT":"2024-05-23 22:26:59","modifiedDate":"2024-07-29 14:14:53","modifiedDateGMT":"2024-07-29 19:14:53","commentCount":"0","commentStatus":"closed","categories":{"coma":"<a href=\"https:\/\/itzcubatutorials.com\/category\/games\/gta-v\/\" rel=\"category tag\">GTA V<\/a>","space":"<a href=\"https:\/\/itzcubatutorials.com\/category\/games\/gta-v\/\" rel=\"category tag\">GTA V<\/a>"},"taxonomies":{"post_tag":""},"readTime":{"min":1,"sec":47},"status":"publish","excerpt":"Unlock the full potential of GTA 5 with Menyoo 2.0! This guide will walk you through the steps to download and install the latest version of Menyoo, enhancing your gameplay with advanced features and customization options. Dive into the world of mods and elevate your gaming experience today."},{"id":1864,"link":"https:\/\/itzcubatutorials.com\/roaring-kitty-ignites-gamestop-frenzy-stock-soars-and-shorts-scramble-as-meme-legend-returns\/","name":"roaring-kitty-ignites-gamestop-frenzy-stock-soars-and-shorts-scramble-as-meme-legend-returns","thumbnail":{"url":"https:\/\/itzcubatutorials.com\/wp-content\/uploads\/2024\/05\/image-1.png","alt":""},"title":"Roaring Kitty Ignites GameStop Frenzy: Stock Soars and Shorts Scramble as Meme Legend Returns!","postMeta":[],"author":{"name":"Frank","link":"https:\/\/itzcubatutorials.com\/author\/admin\/"},"date":"May 13, 2024","dateGMT":"2024-05-13 18:24:17","modifiedDate":"2024-05-13 13:24:25","modifiedDateGMT":"2024-05-13 18:24:25","commentCount":"0","commentStatus":"closed","categories":{"coma":"<a href=\"https:\/\/itzcubatutorials.com\/category\/finance\/\" rel=\"category tag\">Finance<\/a>","space":"<a href=\"https:\/\/itzcubatutorials.com\/category\/finance\/\" rel=\"category tag\">Finance<\/a>"},"taxonomies":{"post_tag":""},"readTime":{"min":1,"sec":0},"status":"publish","excerpt":"Explore how Roaring Kitty's comeback ignited a GameStop stock frenzy, impacting market dynamics and highlighting the power of social media in trading."},{"id":1851,"link":"https:\/\/itzcubatutorials.com\/how-to-download-and-install-java-21-jdk-21\/","name":"how-to-download-and-install-java-21-jdk-21","thumbnail":{"url":"https:\/\/itzcubatutorials.com\/wp-content\/uploads\/2024\/05\/1.jpg","alt":"Java 21 Install Guide"},"title":"How to Download & Install Java 21 (JDK 21)","postMeta":[],"author":{"name":"Frank","link":"https:\/\/itzcubatutorials.com\/author\/admin\/"},"date":"May 6, 2024","dateGMT":"2024-05-06 23:16:51","modifiedDate":"2025-03-17 17:22:06","modifiedDateGMT":"2025-03-17 23:22:06","commentCount":"0","commentStatus":"closed","categories":{"coma":"<a href=\"https:\/\/itzcubatutorials.com\/category\/software\/java\/\" rel=\"category tag\">Java<\/a>, <a href=\"https:\/\/itzcubatutorials.com\/category\/software\/\" rel=\"category tag\">Software<\/a>","space":"<a href=\"https:\/\/itzcubatutorials.com\/category\/software\/java\/\" rel=\"category tag\">Java<\/a> <a href=\"https:\/\/itzcubatutorials.com\/category\/software\/\" rel=\"category tag\">Software<\/a>"},"taxonomies":{"post_tag":""},"readTime":{"min":1,"sec":33},"status":"publish","excerpt":"Guide to Install Java 21 JDK on Windows 10 and 11: Download, Setup, Environment Variables, First Program, Tutorial Steps"}]