What will you learn?
In this step by step guide you will learn how to add shaders to Minecraft after you have installed either OptiFine or Iris.
Shaders will make Minecraft looks a lot better than the default vanilla looking game. However, we do have to consider that adding shaders could affect the performance of our game, which is why we only recommend that you add shaders if your PC could handle it.
In the other hand there are some shaders that have low requirements when it comes to performance, meaning that even a potato PC could run them.
Guide
Step 1
Well after we have downloaded our shaders of preference we need to open the matching Minecraft version that we desired to add the shaders to.
Once the game is open click the button labeled as Options.

Step 2
After you click Options a new menu will be open. Mainly we have two different options either the OptiFine menu or the Iris menu. The menu that comes up doesn’t really make a different for this step, as they will both contain a button labeled “Shaders…” or “Shader Packs” which we are going to click.


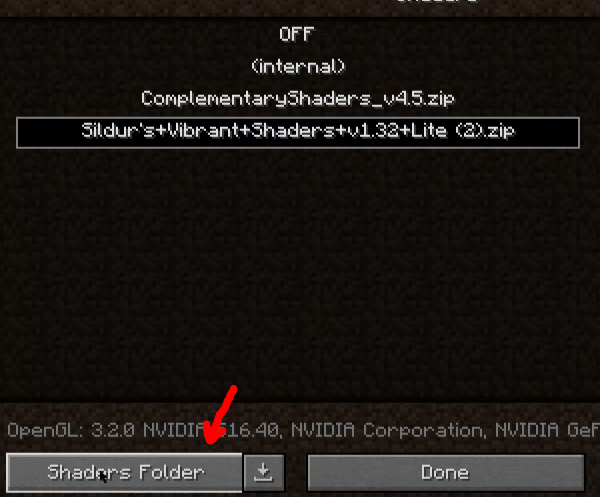
Step 3
Regardless of how our game look, once we click on the Shader button we are going to get a Menu that contains a button labeled as either “Shaders Folder” or “Open Shader Pack Folder”.
Click on this button.

Step 4
Once we click on the previously mentioned button a folder will pop up. This is the folder where we are going to drag and drop the zip file containing our shaders of preference.

Step 5
After we dropped the zip file into the shaderpacks folder we can now close the folder and launch the game back up.
Now make sure that the Shaders are Enabled.
Then select the shaders once they appear on screen, then click apply and you are done.
You can now go back into your game and enjoy the good looking shaders!

Done!
You have now successfully added shaders to your Minecraft game.
Now is time to go start adventures in your world using shaders to make every moment feel more unique. Maybe you choose realistic looking shaders or maybe some cartoonish ones, whatever option you choose, we are sure you are going to enjoy them a lot.
Let us know if we were able to help you set up shaders successfully, and if you have any questions let us know in the comment section, we are glad to help you solve any issues that might come up regarding this guide.