What will you learn?
In this step by step guide you will learn how to add mods to Minecraft, no matter if you are using Fabric or Forge.
Keep in mind that adding mods will alter the vanilla experience of the game, do so at your own risk.
Whenever we are download and adding the mods we need to check if they are made for Fabric or Forge, because mods aren’t cross compatible as of now
Guide
Step 1
First you want to open your Minecraft Launcher and head over to the Installations section in the top.

Step 2
Now hover over either your Forge installation or your Fabric Loader Installation until the folder button appears like shown in the picture below.
Click that folder.

Step 3
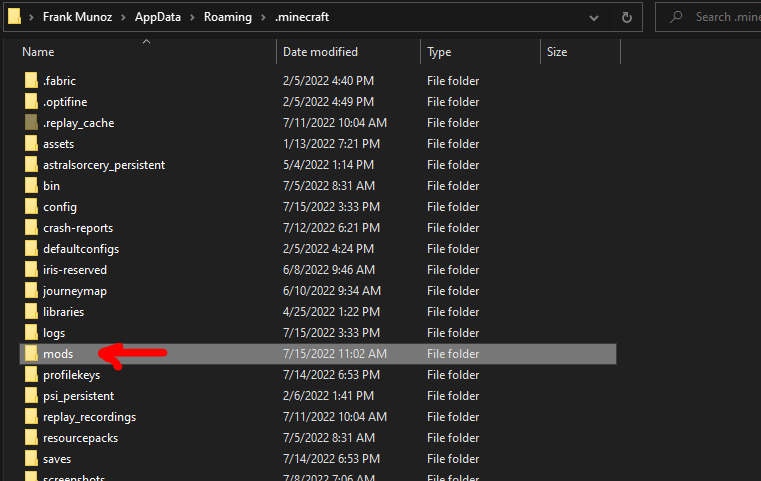
Once you click on the folder button, the .minecraft folder will pop up.
Look for a folder name “mods”, in case this folder doesn’t exist just go ahead and create it. Once you found or created this folder go ahead and open it.
Step 4
In here we are going to drop our jar files (the mods)
Like we mentioned earlier, make sure you select the mods that match your Minecraft instance, for example a mod meant for Forge 1.19 won’t work with Fabric or with any other version of Forge below or above 1.19.

Step 5
Close the folder and launch Minecraft, in here, click the button labeled as Mods.

Step 6
Check to see if your jar files (the mods) are showing, if they are not showing it might have to do with a mismatch between the Game version and the Mod version.

Done!
You are now done adding mods to your game. Feel free to go and try as many mods as your computer can play at once, we do recommend you only download mods from trusted websites. We ourselves like using www.curseforge.com to download mods, this is not a sponsor, is just our opinion.
Let us know in the comment section if we were able to help you add mods to your game and if you have any questions comment it below as well and our team will be here willing to help you.